Pages

Thursday, 28 December 2017

Provisional cast on - Diamond Haven Blanket


Diamond Haven Blanket 

I was very honoured to be asked by Love Knitting to design a blanket for the Breast Cancer Haven. It is an amazing charity that supports women through their breast cancer treatment. When breast cancer tries to rob a woman of her individuality, her confidence or her strength, they provide the tailored package of emotional, physical and practical support that helps her hold on to them.


The blanket is modelled by service user Alexia: “At first I wasn’t able to talk to other people about my diagnosis, but through my time at Breast Cancer Haven, I’ve realised how important it is to connect with others. Breast Cancer Haven is a special place and a great support network, it’s given me support to love and care for my mind and my body. They also gave me the tools and confidence to discuss my diagnosis and treatment with others.”

All proceeds from the sales of this pattern will be donated to Breast Cancer Haven in support of the The Big Tea Cosy, which takes place March 1-31, 2018, and raises money and awareness for Breast Cancer Haven. If you’d like to donate your project, you can send it to Haven's London centre where they will be gifted to breast cancer visitors. 
Download your free message tag, and find the address here
You can purchase the pattern for the DiamondHaven Blanket on Love Knitting, please click here


When designing the blanket, I wanted the making of the project to be easily portable, so the maker can take it along and work on trains, planes and buses! Of course, It had to be soft to bring comfort so MillaMia Naturally Soft Aran yarn was the perfect choice as it’s insanely soft, and it comes in a beautiful range of colours. I have chosen greys and yellow, as I’m slightly obsessed with this colour combination and yellow is a very happy colour, symbolising sunshine and happy times, hoping it will bring comfort to a person going through very tough time. 


The blanket is constructed out of individual squares which are then joined together. There are two types of squares, one plain stocking stitch and one lacy. Each square is knitted from the centre out, which gives the makers full control of how large you would like the squares to be.  Garter stitch border finishes each square in one colour, when the squares are joined together this gives a lovely definition to the centre of each square.


The squares are knitted from centre, which means you will work using 5 double pointed needles (DPN) and start with provisional cast on. I have created a little tutorial below to help you get started.
There are many techniques out there how to work a provisional cast on, I want to show you one that I use the most and this method requires a crochet hook.

Provisional cast on is a way of making a temporary cast on, one that can be easily removed and will give you live stitches on your needles so you can continue to knit, unravel or cast off. It is especially useful when starting the squares of this blanket as you can just pick up the live stitches while unpicking the crochet edge and gather them tight to close up the centre of the square.

The blanked is knitted using 5 x 5mm (US 8) DPNs, you will need 5.50mm (US I/9) crochet hook, scissors and tapestry needle, main yarn for the square and waste yarn in contrasting colour. I use a hook a bit bigger than the needles as I want to make bigger chains for ease of working into them.


1: Using the waste yarn in contrasting colour (so you can see it when you unpick at the end) make 10 chains, I always like to make 2 more chains than the number of stitches needed for my project, few extra chains just in case. Cut the waste yarn and pull it through last chain to secure. 


 If you look at the right side of your chains you will have a row of Vs, if you look at the wrong side you will see a row of ‘bumps’, we will work into these bumps.

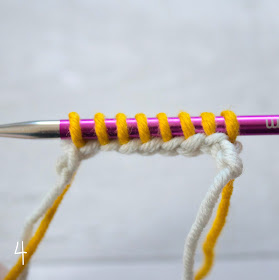
2, 3 & 4: Using the yarn and one DPN that you will use for your project, leaving a tail of around 15 cm (6''), pick up and knit a stitch in the ‘bump’ of each chain until you have 8 sts. 


5 & 6: Separate the stitches onto 4 DPNs, you will have 2 sts on each needle. 


7 & 8: Using the 5th DPN start working in the pattern, until you reach a good size to comfortably unpick the provisional cast on or until you finish the square. 

TIP: When you knit few rows place a marker to denote the beginning or round.  I found it very useful to pin a lockable marker into the beginning few rows of my work, as working on DPNs and placing the marker on the needle causes it to fall off constantly (pic 8).


9: When you are ready to unpick your provisional cast on, thread your main yarn tail through a tapestry needle.

10: With right side facing and using the tapestry needle unpick the knot you made at the end of your chain. 
 
11: Carefully pulling on the tail, unravel one stitch at the time, as each stitch becomes free, slip it on the tapestry needle. 

12 & 13: Once all the chains have been removed you have lovely live stitches on your tapestry needle.
Pull tight on the tail to close up the opening. 


14: Push the tapestry needle to the wrong side of work and weave in the tail around the centre to secure.

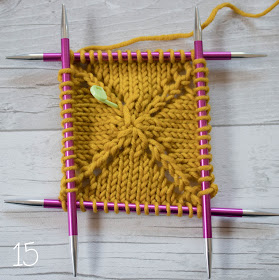
15: Hey presto! One square finished with a lovely neat centre. 


Hope you all enjoy knitting the blanket and helping such a worthy cause. 


Anna x


Thursday, 21 December 2017

Christmas baubles


I have been completely obsessed with embroidery lately, and have been trying out different stitches. Of course, the first thing I wanted to try is to embroider onto crochet fabric, which gave me an excuse to play with Scheepjes Catona. The cotton yarn is now available in the cutest 10g balls in a huge range of colours and at 55p each, who could blame me! I decided to create something festive and the result are these charming Christmas baubles. 


They are pretty quick to make, it takes me around 1.5 hours
to completely finish one, so still time to make few before
Christmas.
Hope you enjoy making them as much as I have.

Materials 
Scheepjes Catona - 100% Mercerised Cotton - 10g -
25m/27yrd
Colours used: 130 Old Lace, 173 Bluebell, 192 Scarlet, 205 Kiwi, 241 Parrot Green, 251 Garden Rose, 391 Deep Ocean Green, 411 Sweet Orange, 513 Apple Green, 514 Jade, 518 Marshmallow.
3.00mm crochet hook
Lockable stitch marker
Tapestry needle
Toy stuffing
Pencil or tailor’s chalk (optional)

Finished size 
The completed bauble measures approximately 9cm (3.5'') in
height and 14cm (5.5'') in circumference around the biggest
part.

Abbreviations
Ch - chain 
Dc (US sc) - double crochet (US single crochet)
Dc2tog (US sc2tog) - double crochet two stitches together (US single crochet two stitches together)
Ss - slip stitch 
St(s) - stitch(es) 
Rd(s) - round(s) 
Rep - repeat 
Magic Loop - You will find tutorial on how to make Magic Loop on my website: http://moochka.co.uk/pages/support 

Pattern note - Please note that pattern is written using UK terminology with US conversion given in abbreviation list.


Baubles 
Using chosen colour make a Magic Loop. 
Rd 1: ch 1, 8 dc into Magic Loop, pull tight on the tail to close up opening, ss to first dc.
From now on you will work in continuous spiral, which means you will not ch 1 at the beginning of round and slip stitch to close round. Placing a marker on the first stitch of round is vital to denote the beginning of round. Move the marker up on every row. 
Rd 2: * 2 dc into next st, 1 dc into next st, rep from * to end. (12 dc) 
Rd 3: 1 dc into every st to end. 
Rds 4 & 5: as rds 2 & 3. (18 dc) 
Rd 6: * 2 dc into next st, 1 dc into each of next 2 sts, rep from * to end. (24 dc) 
Rds 7 to 10: 1 dc into every st to end. 
Rd 11: * 2 dc into next st, 1 dc into each of next 3 sts, rep from * to end. (30 dc) 
Rds 12 to 16: 1 dc into every st to end. 
Rd 17: * dc2tog, 1 dc into each of next 2 sts, rep from * to last 2 sts, dc2tog. (22 dc)
Begin stuffing the bauble. 
Rd 18: * dc2tog, 1 dc into next st, rep from * to last st, 1 dc into last st. (15 dc) 
Rd 19: * dc2tog, 1 dc into next st, rep from * to end. (10 dc)
Change to contrasting colour. 
Rds 20 to 23: 1 dc into every st to end.
Insert more toy stuffing into top of bauble. 
Rd 24: *dc2tog, rep from * to end. (5 dc)
Cut yarn leaving 10cm (4’’) long length for weaving in.
Following the picture tutorial below, work as follows: 
1 & 2: Using tapestry needle, weave in yarn around the opening, I have used contrasting colour so you can see
better. 
3: Pull tight on the yarn to close up the opening. 
4, 5 & 6: Hide the tail of your yarn in the top of bauble by
inserting your needle downwards through the top of bauble,
then back again the same way you took your needle out, to
trap the yarn. Cut off excess tail.

 
Embroidery 
I have used only three types of stitches on the baubles: a
combination of back and straight stitch, running stitch and
chain stitch. I’m not an expert in embroidery (not even close!)
I just try out things and see what the finished product is like. I
think embroidery gives you lot of freedom as you really don’t
have to follow the rules, no need for structure, try it, if you
don’t like, then undo. The wonderful result of embroidering
onto crochet is that the finished result looks rather clumsy (in
a good way), which to me means handmade.   
Crochet fabric does not produce perfectly straight lines so
working embroidery onto it gives you the perfectly rustic
look. 
 

Below is little tutorial on how I worked some of the stitches.
These are just guide lines that worked for me, if you find a
way of working them better, then that’s fantastic. This is the
first time I have tried to explain how to work embroidery
stitches, I hope my instructions will be clear.
Please check out thespruce.com website, I have found it very
helpful for explanation on how to make some of the stitches.
For the snowflake bauble, I have drawn a template, then
traced it onto the side of the bauble using tailor’s chalk as it
dusts off easily. If you do not have a tailor’s chalk use a
pencil or just try embroidering free hand. 

Snowflake
For the snowflake, I have used a combination of back and
straight stitch. 
1 & 2: Thread your yarn through a tapestry needle and inset
it from the back to front, where the centre of the snowflake will be.
3 & 4: The long spikes of the snowflake stretches over 4 rows and the short ones over 2. The long ones are made using back stitch and the short ones using straight stitch. Insert your needle two rows above the centre and out again 2 rows above that. Pull the yarn through, being careful not to pull all of it out. 
5 & 6: Insert the needle back into the same place as the end of first half of the spike (this creates the long spike of the snowflake) and at the same time pull the tip up 2 stitches to the left (this will create the short spikes). 
7: Insert the needle back into the centre (short spike made) and pull the tip up through 2 stitches to the left (this is the first half of second long spike). 
8 & 9: Insert the needle back into the centre and pull the tip up 4 stitches to the left, in the same line as the first half of the long spike. 
10 & 11: Insert the needle back into the same place as the end of first half of the spike and at the same time pull the tip up 2 rows below (this will create the short spikes).
Continue repeating steps 8 to 11 until the full snowflake is made.


Embroider the little branches of the spikes using the straight
stitch, just going 1 stitch to each side of the spikes.
The dots above the short spikes are made using the running
stitch (see below for instructions)
When you finish the star, hide the yarn by feeding it through
the bauble twice, so it gets trapped in the stuffing, cut the
excess tail.
 
Running stitch 
I have used this stitch at the bottom, around the decrease
part and the tops of the snowflake bauble.
Starting at the back 
1 & 2: Insert the needle in and bring the tip up 1 stitch apart. 
Pull yarn through. 
3 & 4: Repeat the last steps with 1 stitch apart all around the
bauble.
Feed the yarn through the bauble to trap it. 


Chain stitch 
I used this stitch on the firework bauble. It looks beautiful
when done in different colours.
I have worked this stitch over one double crochet stitch going
up, down and sideways. 
1: Bring the needle up through back to front. This is your
starting point. 
2: Insert the needle again at the starting point and bring the
tip up 1 stitch away. 
3: Place the yarn behind the needle and pull the needle through the loop. 
4: Insert the needle back into the same stitch you just came
out from, but making sure the loop is secured in-between the
two strands of yarn. This will trap it and you can move on to
the next chain stitch. 


Straight stitch
This stitch was used to create the stars and crosses on the
top of the firework and star baubles.
The stars are worked as described in the snowflake but all
the spikes are made with single thread and over one or two
stitches. The crosses on tops of the baubles are made the
following way:
Starting from the back and around 2 rows up from colour
change. 
1: Insert the needle in and bring the tip up 2 stitches apart.
Pull yarn through. 
2 & 3: Insert the needle from top, 2 rows up and 2 stitches
apart, going downwards, bring the tip up 2 rows below, this
should be in line with the starting point. Pull yarn through.
This is the first leg of the cross. 
4 & 5: insert the needle in the same place as starting point,
pull the tip up through the same point as end of last step. Pull
yarn through. The second leg of cross made. 
6 & 7: Insert the needle, 2 rows down and 2 stitches apart,
going upwards, bring the tip up 2 rows above, this should be
in line with the end of last step. Pull yarn through. This is the
first leg of second cross. 
8 & 9: Insert the needle in the bottom corner of previous
cross, pull the tip up through the starting point of last step.
Pull yarn through. Second cross completed.
Continue repeating steps 2 to 9, working around the bauble.
Feed the yarn through the bauble to trap it.

 
I would like to take this opportunity to wish you all a very Merry Christmas

Anna xx 

One last thing; Please excuse the rather wonky wreath, it's the first time I actually properly shaped one (apart from the ones for the wedding, but they were in ivy, far easier). Quite a good fun though, and costs nothing, I used branches from my garden and local park.